Monday, January 11, 2016

Double Duty Day

I was stumped this month for sure...I can't say with all the busyness of Christmas that I really noticed any good double duty ideas. Not saying there wasn't any, just that I wasn't paying attention !! Then I cleaned out my hobby room and found photo albums,photo sheets,  and even slide sheets that have never been used. Which got me thinking, what else could I use these for.......


 Idea One:
Keep track of the projects and fabrics you've used with a little sampler book.

Idea Two:
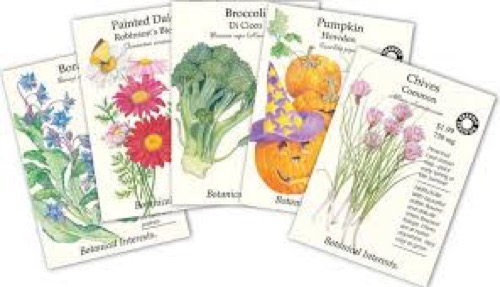
Organize your gardening seed packages


Idea Three:
Organize your machine needles or flosses using the slide sheets. There is even a label on every sleeve.

Idea Four:
Organize your acrylic stamps. Double stick tape the plastic sheet to cardstock and slide them into which ever sheet size works....or use sheet protectors for this one.
Seen this idea at Joyfully Made Designs.... what a great way to keep them organized and labeled!!


I think we could go on and on with this once your brain starts to think outside the box.....stickers, gift tags, jewelry......


Have Fun coming up with your own ideas....
and if you don't have any of these laying around at your house not doing anything, keep your eyes open during garage sale season and second hand type stores or friends cleaning out their rooms....


Friday, January 8, 2016

One Block Wonders January Around the Block

Around the Block

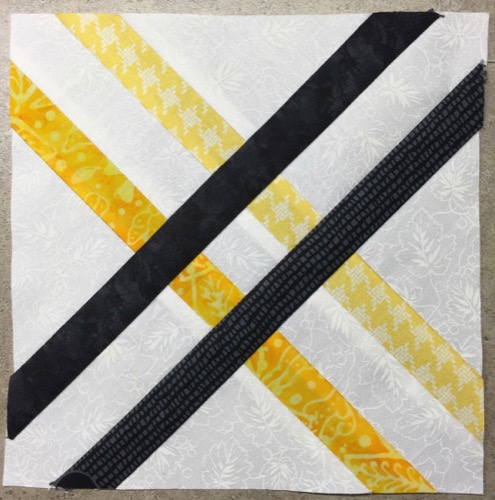
So glad to finally be sharing this pattern with all of you....It was the block that started the whole BOM.
Hope you are all as excited as I am.....

Well let's get some fun business out of the way first..... Our winners for December. 
Congratulations to


Ioleen, Melissa and Rosa!!
I will be sending you all an email....


Also don't forget about the discount code 
Rita from Fabric Please 
is offering during our BOM all year long


This Month Pam from Mad About Patchwork is working with us too....


and we're showcasing the MeadowBloom line by Moda


Pam is offering a 20% discount all month on the Meadowbloom line
using discount code 
BLOOM20


Around the Block Tutorial


Tips: 
1) No matter what size you choose to make your quilt, make sure it is in multiples of 2, or your pattern will not be complete.

2) Label your colours... lay your pattern pieces out with pattern side up and label where each colour will go. That way you won't end up with the wrong fabrics joining together.
(the blacks are solid piece, but the yellows come together during assembly)

3) You can tape the middle section together, by cutting away the one seam allowance and then matching the sew line and tape in place, if you don't want to sew the sections together.


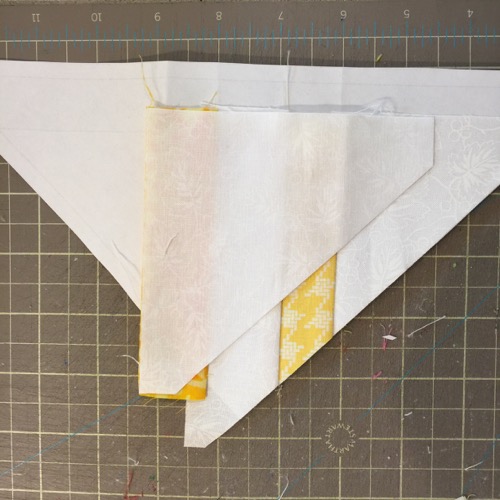
4) Make sure you trim the notched ends. 

Then the middle sections angle matches up perfectly for sewing your seam. 

5) Roll back your centre section to check that your "yellow" sections are lined up an "nested". I pinned mine to keep them in place for sewing. 


You know your square is big enough when you pin it in place and there is more than half left. Now this square will cover both of the triangle sections.


line up the 90 degree angle for the other side


Inspiration:

Meadow blooms

My Nephew's quilt built with the above pattern: Love this block!!


If you haven't joined our FaceBook group

   this is a good time to! I am only posting the colouring sheets to our group page, and this is a good one to have those for. 


Wednesday, January 6, 2016

2016 Finish Along Quarter 1

Ok so I totally forgot about the Finish Along until I  the reminder post on IG....

If you haven't heard about it there is a link in my sidebar...and above.....
a fun way to get motivated to finish your WIPs or UFOs in my case......eek!


As some of you might know I made the big plunge after saving for years and have ordered a long arm quilter. So one of my major goals this year is to get the 25 quilt tops sitting in my bedroom quilted and into use!!! But for this quarter my list will be more geared to getting my BOM samples done, along with the Bag of the Month projects done, so when my long arm arrives I can spend a lot of time playing and learning how she works!!!
Oops, should have read the complete rules....a completed quilt project is to actually be quilted and bound....so I'm out on that until my long arm arrives.....


My List

  1. Finish my samples and tutorials for BOM (Feb, March, April)
  2. Complete the Bags for Jan, Feb and March
  3. Complete 3 bags from previous years not done
  4. Finish all my Scrappy Trip Around the World blocks (all in Reds and White)(I'm still going to get my blocks done, so this can be on the next quarter's list!!)
  5. Adding 2 quilts, just incase the long arm arrives and I can figure out what I'm doing, lol!! Thinking positive!
Not a long list but that is 8 projects to complete totalling a lot of work......hope I can stay focused!!

Tuesday, January 5, 2016

Learning New Knitting Techniques

I saw a very interesting knit hat posted recently 
 on Jennifer's  (@silverbarnes) Instagram account and had to give it a go myself! It's a free pattern called 1898 Hat
Well as it turns out, not only is it a very cool pattern, but their is a great opportunity to be able to give back too!!

The pattern is a free download from, The Seamen's Church Institute Christmas at Sea, a program run to help Mariners. You can find out all about it here...
Now I don't know much about the charity or the site, but I love opportunities to be able to give back, anyway I can, and I love to knit....and I received a great free pattern....so why not make one or two and send them back to help keep someone warm out on the water and say thanks for the pattern!!


The other reason I wanted to make a post about this hat, besides linking to the pattern itself, was because I learned a few new knitting tricks with this hat that I have never tried before and wanted to be able to find the links myself later on....lol


1898 Hat

1. The first thing I learned was a Provisional Cast On.....a way to keep your stitches live to come back to later....I watched this video how to using a crochet hook, easy peasy.

https://youtu.be/R3J-sUx_whE


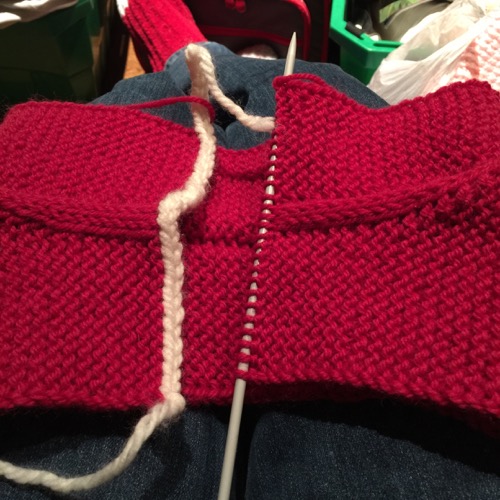
2. The second technique I learned was Grafting in Garter Stitch, but I am going to add links to Garter Stitch and Stocking Stitch, because I should have switched when I came to the middle fold section and didn't....this was my learning hat,  the next one will be even better.....

Garter Stitch Grafting or Kitchener Stitch:

Stocking Stitch:


3. Thought I would share a tip of my own too.....when I  am working on a pattern that requires me to keep track/count any of the stitches or rows, I place the pattern inside a clear heavyweight sheet protector in a binder and use a China Marker to check or tick as I go. Later when I am done I use a tissue and just wipe the marker away!! (a dry erase marker will work too but rubs off the plastic too easily) Ready for the next time I make the same pattern. 


 That's it.....enjoy
and I hope you try one


Monday, January 4, 2016

Travel Cup Cozy

I found this pattern awhile ago  over on All People Quilt and have made multiple versions of the design, so I thought it was about time to share my tweak of the original and the original link and version again. 
These are a great scrap buster and gift to have around to share with others.


What you will need:
  • Find the Original Pattern here. 
  •  My Version of the pattern here.  (I've only added my tweaked pattern for those who aren't comfortable with tweaking a pattern. You can print the original and use or tweak to your own preference. I squared mine up so the cup was covered all around and not exposed where the corners rounded on the original)
  • Batting 
  • Scraps of fabric for piecing
  • Backing fabric
  • Round elastic or hair elastics
  • large button (I tend to use 7/8"- 1.25" buttons)
  • needle and thread
  • normal sewing supplies
  1. Cute 3 pieces with your pattern.1 front* ,1 back and 1 batting. Mark the open spot (for turning after sewing) on the wrong side of your backing piece. *How you complete your front piece is where all the fun is....you can design the top of your cozy anyway you want. Solid piece of fabric, appliqué, pieced, quilt as you go.....If piecing or quilt as you go, create a piece larger than the pattern and cut pattern out after sewing your pieces together.
  2. When your front is done, if you have quilted  yours it already has the batting attached, if not lay your backing right sides together on your front piece and add a piece of batting cut with pattern on top. Pin all three layers together to prevent shifting. 
  3. Add a piece of elastic to the one end of your cozy, matching raw edges. Make sure you have about an 1" loop on the inside. I backstitch this area a few times when I am sewing the seam for extra strength. 
  4. Sew together leaving the opening you marked for turning(I have started to sew mine with a 1/4" seam, I like it a bit wider), backstitch at the beginning and ending of sewing.  Clip corners to remove some of the bulk and turn right side out and press, taking care to press the seam fabric inside where the opening is. Topstitch close to the edge, making sure to catch both sides at the opening to close it with your topstitching.
  5. Wrap the cozy around your favourite cup (mine is a Medium, Dark Roast, 2 sugars from Tim Hortons, :) and mark where you will want to sew on your button. Sew on your button....

And that's it!! Your hands won't get burnt and your cup will never have looked better. 
I'm warning you now though, make extras 
because all your friends will be asking for one of their own.....lol


If you need a refresher or are new to quilt as you go, I made a tutorial awhile back.....but remember I didn't add the backing fabric during the quilting for the cup cozy, just stitch the fabric to the batting.


Monday, December 28, 2015

December One Block Wonders Link Up

Hope everyone had a great Christmas!! It came and went so fast....but that means....

It's time for our December Link up 
and this month there are some very nice prizes available to be won !!
I hope everyone made the time to sew at least one block!?! There were so many options given this month too....
I have made one change to the schedule...the link up will run from Dec 28th -Jan 7 10pm EST, 
and the January block will go live on Jan 8th 
(the second Friday of the month instead of the first, which was New Year's Day)
Gives you some extra time for December if you need it. 


1st Prize 
from


FQ Bundle of Color Weave


2nd Prize
from


$40.00 Online Store Gift Certificate


3rd Prize
from


 $20.00 Online Store Gift Certificate


Good luck everyone. 
I can't wait to see what you have all been up to!
I certainly have been enjoying Jean's progress posted on our FB Group. page


The December Winners are.........Ioleen, Melissa and Rosa