Showing posts with label Love. Show all posts

Monday, January 30, 2017

Pieced and Quilted Pillow Tutorial

I've been making a number of pillows lately and I love the feeling of piecing
 and finishing a project the same day! Well usually any ways.... and I'm calling mine mini quilts....
because let's face it, I've done the same work as if I was building a mini quilt, I just chose to turn this into a couch display instead of a wall display, lol!

This is my new block pattern L.O.V.E. and don't we all need more of that right now!
You can find it in my Craftsy Pattern Shop 


Well after making these last two Valentine's Day themed pillow covers, I thought it was time to just post a tutorial, incase you wanted to see my steps, and also my own personal reference map. Sometimes when there is too much time in between even I forget what I have done too, so this is my version of writing things down! 

Tips: 
  • If you plan on piecing and quilting a pillow cover, remember that during the quilting, your block will shrink, so add 1-2" to your block to account for that and give you room to trim your block back to square. So if your block is 18" and you want to make an 18" pillow, add a 1" border before quilting and trim to size after. 
  • I buy light coloured, cheap fabric to use for backings when quilting pillows. That way it doesn't add a lot of bulk and I don't feel bad that it is inside the pillow and no one ever sees it.
  • I like a tight pillow so I cut mine to the size of the form, so  12" form I would cut my front and back to 12". An 18" form I would cut my pieces to 18", and so on. If you wanted a looser cover, just add 1/2" to your overall measurements. (my pillow preference is 18" and 20")

18" Pillow Cover with flap covered Zipper Back:

Pillow Front:
Make a pieced front that is at least 1-2" bigger than your end pillow size. Quilt as desired. Trim to size.

Pillow Back:
(2) 9.25" x 18" pieces of backing fabric

  • I have also pieced the back, by sewing 4.25" x 18" and  5.50" x 18" pieces of fabric together to form the 9.25" x 18" or any combination to get the end size listed. 
  • And using this formula you can figure out any sized pillow back: The size of you are cutting your pillow (for me the size of the form) 18" divided by 2 plus 1/4" for the zipper seam. So (2) pieces 9.25" x 18" (pillow form again.)

(1) 4" x 18" piece of fabric for the zipper flap
(1) 20" zipper (I tend to use a larger zipper and cut off the excess. That way you avoid dealing with   the metal ends.
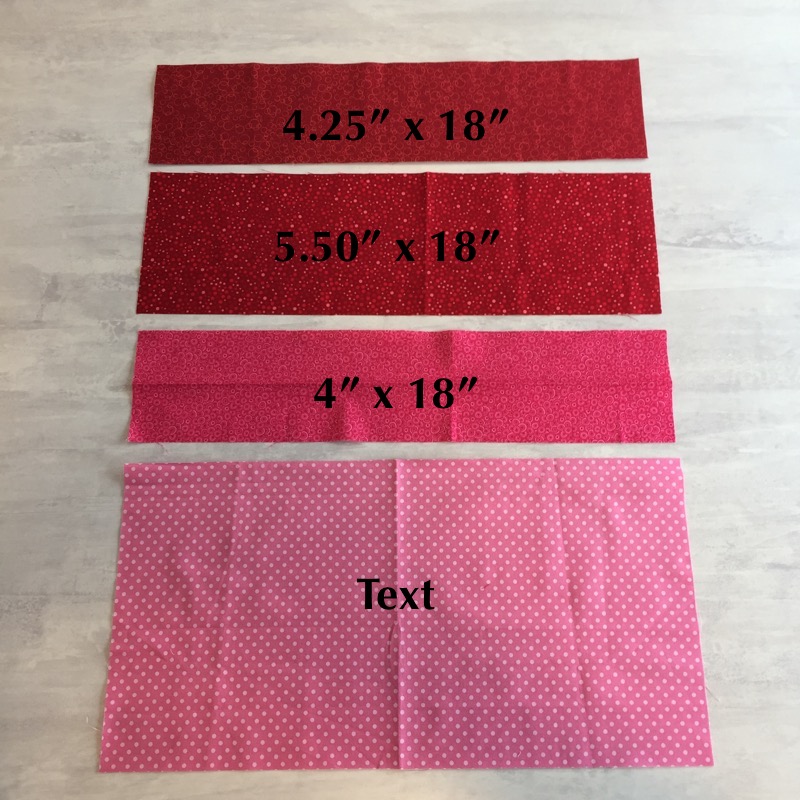
1) Sew your pieces together if you are making a pieced back, and press your seam. Also press the 4" x 18" flap piece in half along the long 18" length. Making your flap 2" x 18".


2) Place the zipper right side down on top of the flap, matching the edge of the zipper tap with the raw edge of the zipper. Put a couple of pins in to hold or base stitch in place. Zipper should extend passed the flap at both ends.


3) Now place the flap and zipper onto the bottom edge of your top 9.25" x 18" pieces, matching the raw 18" edge and sides, so the flap is centred. Add a few more pins and using your zipper foot and 1/4" seam, sew the one side of the zipper in place.


4) Press the fabric back and topstitch.


5) Pin the flap out of the way and lay it over onto the second piece of backing RST, again matching the zipper tap to the top raw edge of the bottom piece and matching your sides. Pin zipper in place and stitch 1/4" seam.


6) Again press the fabric back and topstitch. Remove the pins from the flap.
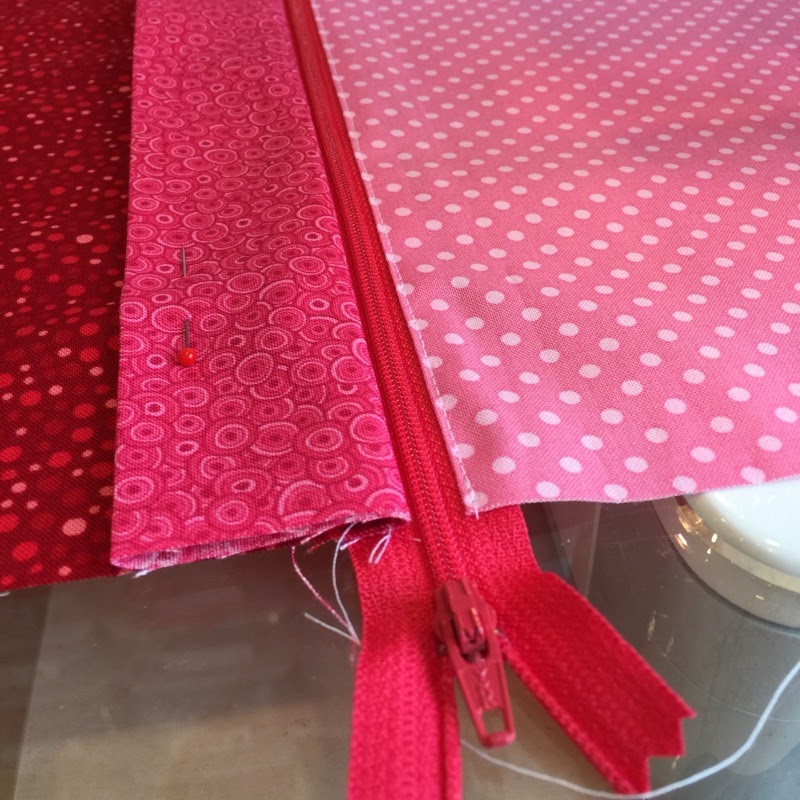


7) Lay your pillow front RST with the pillow back, making sure your flap is facing down and your pillow is right side up. Also make sure the zipper is partially open and inside the 1/4" stitch line. Pin together matching sides and corners and add a quilt label if you have one! Stitch around the entire pillow using a 1/4" seam allowance.


8) Trim the zipper ends of and trim the corners, close to but not throw the stitching, to remove some of the bulk.


9) Turn pillow right side out and press.


10) Add pillow form and enjoy your pillow or mini quilt!!!
I'm calling this new block pattern 4 Times the Love and it can also be found in my Craftsy Pattern Shop. 


SaveSave

Saturday, February 28, 2015

#80 Finishes and Goals for March!!!

February was a fun month...

1. I turned 50, had a party, gave away some awesome gifts (thanks to some great shops)
2. Received a Go Big fabric cutter for my birthday, and now have 5 die cutters!! (awesome hubby)
3. Designed a Valentine's table topper (pattern is coming, because it's always a good time for love)
4. Did some secret sewing (I'll talk about that in a few months!! so excited)
5. Started designing some quilt blocks and quilt patterns (so much fun!!)
6. Started a new project (even though I wasn't going to do anything new...till all of my WIP list was done....) I did get some WIPs done too!!
7. I won 3 FQs of Black and White!!!
8. Have been doing really well with the Sew My Stash  2015 Challenge!! I have purchased, but 3/4 of all my sewing at this point is all stash!!! yippy!!

Finishes:

the new project, I wasn't going to start.....too cute it sucked me in!!


 Needs eyes and bird's legs added, quilting will have to wait on my list.....


January Bag of the Month:


Valentine's Day:


Secret Sewing: All I can show you for now is the backs of the minis!! 2 samples of the pattern. One made with Kate Spain's Sunnyside and the other Shot Cotton and Cotton and Steel.


And finally got the binding on my Craftsy BOM 2012!! I was so excited that I found fabric to match the front...I forgot about the backing fabric. EEK!! not a perfect fit, but I don't plan on every laying it backside up on the bed, so it's ok!


Goals for March

1. Finish sewing the bindings on the last 6 bibs for the Philippines
2. Sew March Bag of the Month and a pattern from last year that I missed.
3. Put together the Block Rock'n Quilt and backing. My Goal for A Lovely Year of Finishes


4. Sew my Come Together Quilt blocks into a top

A very aggressive list, but I think I can get it done!! ;)
 Love having the list to check off, it is really helping me stay focused to get all the WIPs done!! Feels great to cross through the text!!!

To Complete This Year List

Blocks to Piece (blocks not finished)

  • (3)Triple Star Blocks
  • Playing Cards (Bee Blocks)
  • (?) Scrappy Trip Around the World Blocks 
  • Fusion Quilt
  • Flower Patch Quilt
  • Lattice Bones Quilt
  • Colouring Box Quilt
  • Sew Kitchy Paper Pieced BOM (one more block, Miss Betty)
  • Craftsy BOM 2013

Quilt Tops to Sew Together (blocks are complete)

  • Sugar Block Club 2013
  • Sugar Block Club 2014
  • Block Rock'n
  • Classic Meets Modern
  • Aurifil Designer of the Month 2014
  • Globe Trotting BOM
  • Layer Cake Challenge
  • Come Together (Bee Blocks)
  • Playing Cards (Bee Blocks)

Quilt Tops: to Quilt

  • City Sampler
  • Churn Dash QAL
  • Nested Churn Dash
  • Parade (tester pattern)
  • Square Deal
  • Trifle Dish Moda QAL
  • Modern Blocks QAL
  • Virtual Quilting Bee
  • Triangle QAL
  • *Globe Trotting BOM
  • *Classic Meets Modern
  • *Sugar Block Club 2013
  • *Elephant Parade

Quilts to Bind (that's all I have to do, you would think I would just get it done)

  • Bloom Bloom Pow
  • Craftsy BOM 2012
  • Mystery Quilt

New Projects to Do this Year:

  1. 15-30 adult size bibs for special needs children at an orphanage in the Philippines (church missions trip in April) (the number turned out to be 21-just need to bind them!!)*6 left to sew
  2. Design 2 original projects and write up the patterns ( I am excited about this challenge) more info on this in the future  (I did one and may still try for another, but done for now)
  3. 2 quilts (one niece/one nephew )
  4. Set of Placemats (12)
  5. 4 mini Sew Together Bags
  6. 4 Regular Sew Together Bags
  7. 6 Duffle Bags
  8. 6-11 purses, yup not kidding, I join the Bag of the Month again this year over at Sew Sweetness and last year of the six I only made one of the bags. This year I am determined to complete them all. (1/6 done)
  9. New Christmas Stockings (8)
  10. Christmas Tree Skirt
  11. Misc sewing of pouches, because there is always a need for a simple pouch or 10, lol.
  12. *Elephant Parade, because it was so cute I couldn't resist!! Which makes an even dozen new projects. One per month....that's doable.......

*updates

Wednesday, June 19, 2013

#5 What about you?

I want to know.....

Am I the only one, the norm, odd man out, or nuts?  I have so many projects on the go. I'm about a year and a half into quilting and want to learn everything, try everything. I'm like a kid in a candy shop!!


 So to date I am working on:
1. Fusion-featured in American Patchwork Feb 2012
2. By the Sea- featured in Quickly Quilting
3. Craftsy BOM 2012
4. Craftsy BOM 2013
5. Block Rock'n -paper piece
6. Bloom Bloom Pow QAL
7. Christa QAL
8. Mystery Quilt- Gourmet Quilter
9. Modern Block QAL- And Sew We Craft
10. Sugar Block Club
11.  Tula Pink City Sampler QAL- Sew Sweetness
12. Flower Patch QAL- Green Fairy Quilts
13. Sampler Quilt- on my own

I do finish projects too!! This is a quilt I made working on it straight for about a week, for a friend going through a really tough time!! ( who is doing great!!)


And a picnic blanket that I quilted myself, shown in a previous post.

I guess the question is....too much, normal, nuts, par for the course??? lol

What do you think? How do you organize your quilt projects? Would love to hear from you!!

And this is how I store my fabrics and scraps!!