Showing posts with label pattern. Show all posts

Monday, January 30, 2017

Pieced and Quilted Pillow Tutorial

I've been making a number of pillows lately and I love the feeling of piecing
 and finishing a project the same day! Well usually any ways.... and I'm calling mine mini quilts....
because let's face it, I've done the same work as if I was building a mini quilt, I just chose to turn this into a couch display instead of a wall display, lol!

This is my new block pattern L.O.V.E. and don't we all need more of that right now!
You can find it in my Craftsy Pattern Shop 


Well after making these last two Valentine's Day themed pillow covers, I thought it was time to just post a tutorial, incase you wanted to see my steps, and also my own personal reference map. Sometimes when there is too much time in between even I forget what I have done too, so this is my version of writing things down! 

Tips: 
  • If you plan on piecing and quilting a pillow cover, remember that during the quilting, your block will shrink, so add 1-2" to your block to account for that and give you room to trim your block back to square. So if your block is 18" and you want to make an 18" pillow, add a 1" border before quilting and trim to size after. 
  • I buy light coloured, cheap fabric to use for backings when quilting pillows. That way it doesn't add a lot of bulk and I don't feel bad that it is inside the pillow and no one ever sees it.
  • I like a tight pillow so I cut mine to the size of the form, so  12" form I would cut my front and back to 12". An 18" form I would cut my pieces to 18", and so on. If you wanted a looser cover, just add 1/2" to your overall measurements. (my pillow preference is 18" and 20")

18" Pillow Cover with flap covered Zipper Back:

Pillow Front:
Make a pieced front that is at least 1-2" bigger than your end pillow size. Quilt as desired. Trim to size.

Pillow Back:
(2) 9.25" x 18" pieces of backing fabric

  • I have also pieced the back, by sewing 4.25" x 18" and  5.50" x 18" pieces of fabric together to form the 9.25" x 18" or any combination to get the end size listed. 
  • And using this formula you can figure out any sized pillow back: The size of you are cutting your pillow (for me the size of the form) 18" divided by 2 plus 1/4" for the zipper seam. So (2) pieces 9.25" x 18" (pillow form again.)

(1) 4" x 18" piece of fabric for the zipper flap
(1) 20" zipper (I tend to use a larger zipper and cut off the excess. That way you avoid dealing with   the metal ends.
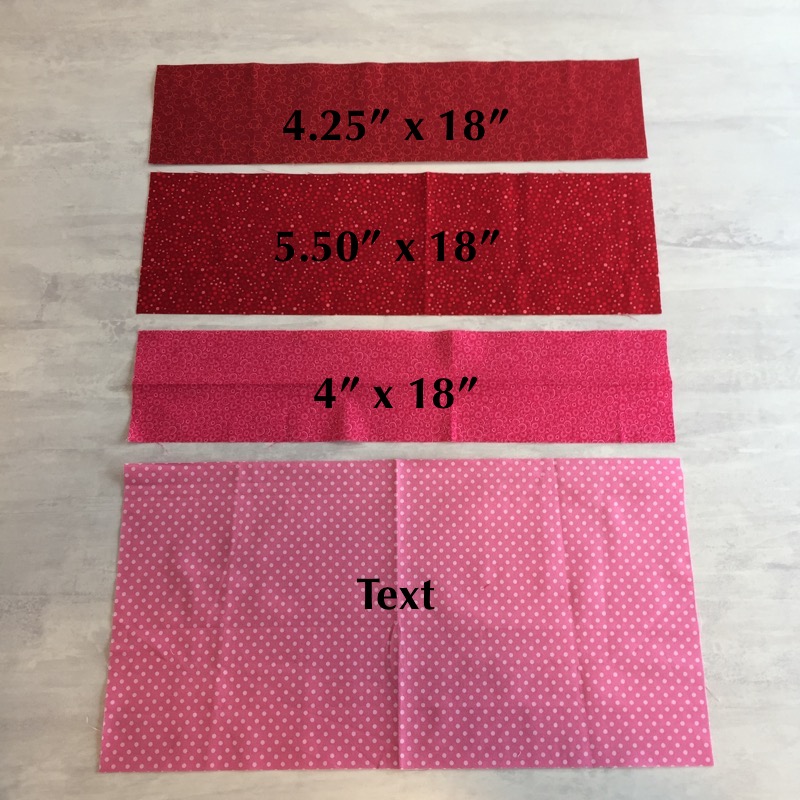
1) Sew your pieces together if you are making a pieced back, and press your seam. Also press the 4" x 18" flap piece in half along the long 18" length. Making your flap 2" x 18".


2) Place the zipper right side down on top of the flap, matching the edge of the zipper tap with the raw edge of the zipper. Put a couple of pins in to hold or base stitch in place. Zipper should extend passed the flap at both ends.


3) Now place the flap and zipper onto the bottom edge of your top 9.25" x 18" pieces, matching the raw 18" edge and sides, so the flap is centred. Add a few more pins and using your zipper foot and 1/4" seam, sew the one side of the zipper in place.


4) Press the fabric back and topstitch.


5) Pin the flap out of the way and lay it over onto the second piece of backing RST, again matching the zipper tap to the top raw edge of the bottom piece and matching your sides. Pin zipper in place and stitch 1/4" seam.


6) Again press the fabric back and topstitch. Remove the pins from the flap.
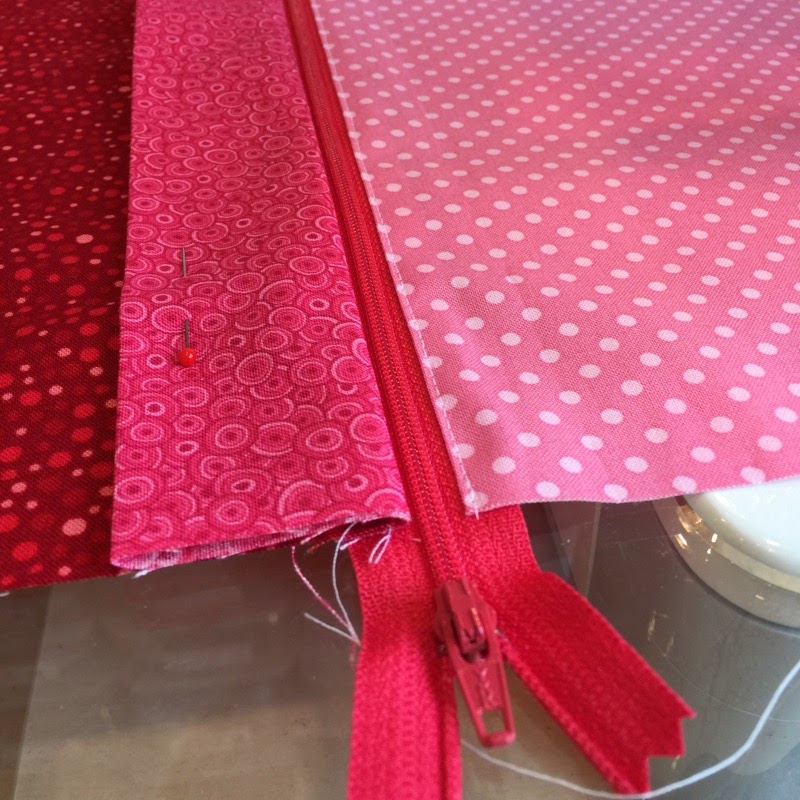


7) Lay your pillow front RST with the pillow back, making sure your flap is facing down and your pillow is right side up. Also make sure the zipper is partially open and inside the 1/4" stitch line. Pin together matching sides and corners and add a quilt label if you have one! Stitch around the entire pillow using a 1/4" seam allowance.


8) Trim the zipper ends of and trim the corners, close to but not throw the stitching, to remove some of the bulk.


9) Turn pillow right side out and press.


10) Add pillow form and enjoy your pillow or mini quilt!!!
I'm calling this new block pattern 4 Times the Love and it can also be found in my Craftsy Pattern Shop. 


SaveSave

Wednesday, December 4, 2013

Holiday Hullabaloo Blog Hop....Day #3 My Post


Monday Dec. 2              Lily Pad Quilting  http://lilypadquilting.blogspot.com/

Tuesday Dec. 3             Sew Cal Gal  http://sewcalgal.blogspot.com/
Bejeweled Quilts by Barb  http://bejeweledquilts.blogspot.com/

Wednesday Dec. 4        Upstairs Hobby Room  http://upstairshobbyroom.blogspot.com/
Freemotion by the River   http://www.conniekresin.com/
                                                               
Thursday Dec 5              A Quilt & a Prayer   http://aquiltandaprayer.blogspot.com/
                                                 Tami’s Quilting Adventure  http://tamichaulk.blogspot.com/
Friday Dec. 6                  Needled Mom http://needledmom.blogspot.com/


I am so excited and honoured to be a part of this Blog Hop! My first Hop as a contributor!! Let me start by introducing myself....
Hi, I'm Sandy. I wear a lot of hats just like the rest of you...wife (28yrs); Mother of 3 great adults...only one left at home, and that is only some weekends home from College. Very strange dealing with empty nest!; Part-time Bookkeeper (married a farmer, love rural life!!); Crafter(lifetime) I have always loved all things crafty, but when I found quilting a few years ago that was it!! I love everything about quilting, especially all the nice people I have connected with via the internet!! Which brings us right back to today!!
 I was thrilled to be asked to participate by Jacquelynne from The Art of Home . I love her website and blog. She is so talented.... artist, fabric designer, writer....check out her blog, online magazine, Etsy shop...you'll see what I mean.
 Jacquelynne Steves The Art of Home

I have only designed 2 very simple  project of my own so far, my nephew's quilt , a simple double sided game quilt and the olive green and cream quilt on my bed. There is so much to learn when you first start a new hobby, I have primarily been making other peoples designs. (But) I knew right away, when Jacquelynne asked me to participate, I wanted to come up with my own design for a simple and quick homemade gift idea using blackboard fabric, that I would be able to share with everyone who stopped by.  I hope you will find inspiration, an idea or two to run with and make your own or maybe you will even try out this project!
Also... read right to the bottom to make sure you don't miss out on anything fun like information on the prizes and my give away too!!


 Portable Chalkboard Mat
First one made, working out the kinks!

Another idea! Buffet Table Runner
(I'm going to post a pictorial for the Chalkboard Table Runner Dec 9)


Find the pattern here

Portable ChalkBoard Placemat 


Prizes....Don't worried I didn't forget!!

Ok, prizes... Jacquelynne is offering a randomly chosen prize per blog, valued at $15-30 (which means I don't even know what you will be winning) and a grand prize drawing at Jacquelynne Steves' blog, worth $100.00. So check out all the blogs to enter including Jacquelynne's, everyday, to increase your chances.


Also I have an October Quilty Box to give away!! I ended up with an extra box, and when I asked Tabitha if it was okay to offer it as a prize she said yes and offered a coupon code upstairs5.
 You can use the code to save $5.00 off your first box if you check out QuiltyBox.com and like what you see. Good till December 19th.


(Sorry about the poor picture, I had taped up the box for mailing before I realized it wasn't in focus)

Now, how to run the prize draw... I thought about asking, how you follow me, but truthfully I have more Instagram followers than blog follower. If you want to follow me, please do I would love that, but I am not going to make that a requirement!! And forget about Facebook, I do have an account, and I think when I post to Instagram it goes to my wall or time line or something, and I know lots of people love it, but between Blogging, Instagram and Flickr  I'm maxed out, I need sewing time too!! lol..... so just look around my blog and leave a comment, letting me know what's your favorite part of Christmas , and you're in the draw for the 2 prizes on my blog. 2 prizes 2 winners! Good Luck everyone!! And thank you for dropping by!!! (P.S) if you do follow me on any of the social medias add another comment telling me how, and you just doubled your chances!! And thanks!!

Please note if you are a none reply entry, another person will be chosen! 

*I usually send a reply to everyone who stops by and leaves a comment, but depending on how many comments are left during the Hop I may not be able to get to everyone. So please don't be insulted if you do not receive a reply during the Holdiay Hullabaloo! Good luck everyone!!