Monday, December 21, 2015

Making Bowl Cozies


FYI......... I have read cautionary tales online about the use of these cozies in your microwave....cotton only is to be used...cotton batting no scrim or glues, cotton fabric and cotton thread....or you could have a fire in your microwave. 

We never put ours in our microwave, because I tend to use leftover batting and I do have polyester thread sometimes, so we just heat up whatever we are eating and slide the bowl into the cozy after microwaving. Also good to use when having ice-cream too, to keep you from melting the ice cream with your hand warmth, just a thought.

Bowl Cozy with Corner Handles

I am going to just run through the process and add a PDF sheet you can download at the end with just the sewing instructions on it for ease of use with the pictures provided in the tutorial itself.

Measure your bowl to determine the size your square of fabric will be. My bowl measured 10" so I will be cutting (2)10" squares of cotton fabric and (2) 10" squares of cotton batting
Large Corelle round cereal/soup bowl

 I made a paper 10" square and drew the diagonal stitch lines (dash lines) and the dart lines (solid lines) I centred my bowl base and traced around with the pen resting on the wider part of the bowl shape. This will give you the approximate length of your dart. Mine is 2.5"

 To figure out the width of your dart, which determines the top opening I suggest pinning your darts and testing with your bowl shape. My bowl has fairly straight sides, a tapered bowl may require less width at the top of the dart.

I started with 1/2" darts but found this was to open for my bowl

Left 1/2" dart to big and opening....right with an inch dart, the bowl fits in securely!!


 I folded my fabric squares in half and then in half again and then fold the square into a triangle pressing with my iron after each fold to achieve my sewing and dart lines. You can then use those lines to add chalk lines if you have trouble seeing the folds.


Pin (I just used my straight pins) one of your squares of fabric to a batting square and stitch all your fold lines.
I know most of the patterns out there say to sew an x (diagonal lines) but  I sew on all the lines to add more quilting and to keep the batting secure.

 You are going to add 4 darts, one on each side of your square

Measure down for your length and out from the dart line for width. Remember you will be sewing with the fabric folded so my 1" dart is actually 2" at the top. (one inch on either side of the dart line)

 Fold your square in half and sew along your dart line (don't forget to backstitch)


 This is what you will end up with when all four darts are sewn>

 Trim off the excess


 Repeat steps with your second fabric and batting squares and pin them right sides together matching darts and points.

 Leave a small section for turning right sides out.

 Before turning trim corners....if your sewing machine doesn't like bulk when top stitching you make want to trim out some of the seam batting....my Janome doesn't seem to mind, and again I like to know that the batting will stay secure as I know these will be washed a lot.

 Turn right side out, press the opening area to keep the seam fabric inside
 Top stitch around the edge as close as you can to the edge, making sure you catch the opening seams to securely close it.


For Small Bowl  (with handles)

Cut (2) 8" squares cotton fabric
       (2) 8" squares cotton batting

Darts are: 1" x 2" long 

Bowl Cozy (no handles)

This version is basically the same with 1 change....
The darts or boxing is done on the diagonal lines
I used the small Corelle round bowl, which measured 8"

Cut (2) 8" squares of Cotton fabric and (2) 8" squares of cotton batting
Build your 2 sections same as for the about, but when you add the darts fold on the diagonal lines and  measure from the tip....again for finding your right dart measurements pin the 4 darts and test your bowl. Once you find the right combination you will be flying.

 This worked boxing off 2" but it left the bottom with a square shape....which isn't an issue and it is very secure, but I will try it with a more tapered shape and update you!!!

 Continue as in the original instructions

 I think we have all decided that we like the handles, but this one is still great, it also would make a great key or change catch all on a table or dresser.....

PDF Pattern Instructions can be found here!


Enjoy


Monday, December 14, 2015

Christmas Happenings......

Just a reminder....there won't be anymore Monday Morning Savings post because I will be updating the Sales and Coupon code page as new savings happen with my blog sponsors, that way you will always have the most up to date info available when you need it!! So just click on the tab at the top of the post next to the home page where you will find all the savings!!


Christmas Happenings.....

I've been busy with the One Block Wonders... I still need to add the border to my quilt.
This is what it should look like,    ;)


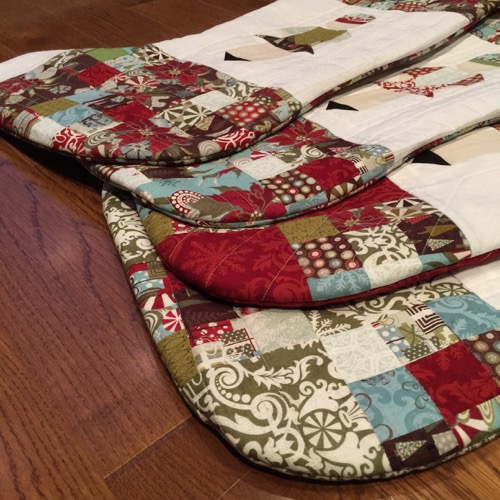
I tweaked the Nut Cracker En Pointe pattern by Aqua Paisley (click here for original pattern) to make a Ballerina, and I am turning them into new Christmas stockings!!


We have fairly large stockings here, but you can adjust the idea to fit any sock pattern you may draw up. 

I used :
Figgy Pudding by Moda
Holiday Ramblings by PB Textiles
Pellon TP971F Fussible Fleece 
  • I drew the stocking  pattern I wanted out on a roll of news print paper.
  • built my quilt nut crackers and ballerinas
  • I wanted the blocks to stand out on the stockings so I added the background white to the sides
  • I made nine patch blocks with 2" squares and cut 5" blocks for the second block
  • Basically I built a rough sock shape that is just bigger than my pattern
  •  1 row of 3 blocks across for the top, and 2 rows of 4 at the bottom (or 3 with an extra white block for a patched toe)
  • I quilted my front piece and then laid the pattern on top, pinned it in place and cut it out.
  • I also quilted my back section. (tip: watch which way you cut your pieces...socks are directional...so double check before you cut.)
  • I lined mine stockings following Cluck Cluck Sew 's tutorial.  (I chose not to add the cuff at the top.)
  • Don't forget to add you hanging hook, and label if you have them.....why the reminder, lol....I forgot mine on the first stocking, I was in such a hurry to get one done....oops
  • my hanging tab was made by cutting some of the scraps into 2" x 4.5" pieces. 

 press in half
 press each raw edge into centre

 press in half again
 stitch down each outside edge 
fold you piece in half matching the raw edged and pin between the stocking and the lining when you are sewing them together
 raw edges matching and fold down

Hope you are having fun

 making all of your Christmas's special, 

with your own handmade style!!


Friday, December 11, 2015

Double Duty Day


I am really liking these Double Duty Day posts. I'm looking at things differently and constantly looking for new and inspiring ideas to post here  (so I don't forget a good idea) and to share with all of you!! (But ooopsI missed the Nov 22nd Double Duty Day, lol, I forgot to hit publish..........well here it is for the Dec 11th......)

1.) My last post I received a comment from a non reply blogger, so I'm pretty sure when I responded to her comment for a picture of the idea, it didn't go through. The item suggested was a Fishing Guides Tackle Box, for notions, like marking pens, sewing machine tools and feet, scissors, rotary cutters, cleaning tools....basically anything you may need to take along with you to  a class or retreat....being totally portable and so well protected too, what a great idea. You just need to find the one that is the right size for your needs, or raid your husbands stash....lol

2.) Came across this brilliant idea on Instagram ....on JayBirdQuilts, though Julie couldn't remember who's IG post  she had originally seen this on. A magnetic knife strip can be used to hold  your scissors.....such a fantastic idea...(just a heads up...good stainless steel is not magnetic...incase you were expanding your ideas of how to use this magnetic strip)


3.) How about using a pool noodle to roll your quilts for storage....perfect, easy, wrinkle and crease free.... 
Use some selvage scraps  or ribbons to tie around the ends  and around the middle to keep the quilts from unrolling....
*UpDate*
Check out this YouTube video by Leah Day on using the pool noodles to store your quilts!!
Thanks so much Moe for the great link!!


4.) This one is a bit of a cheat, because their use is for hanging items, but maybe you haven't given this a thought, so I'm sharing how I have used the 3M stick up hooks.


You need to get the ones with the little metal hook 


and the great part is, if you buy more rulers and need to rearrange your layout, you just pull the tape and it comes right off your wall, no damage!! 


That's it for this Double Duty Day! 


Please let me know if you have any ideas to share or that you have shared on your blog that I can link to and share!! 
If you just have an idea you want to share that you have used, email it along with your name and a picture or two and I will share it in an upcoming post!

upstairshobbyroom at gmail dot com


Tuesday, December 8, 2015

Crochet Baskets

I found this fun pattern online a while ago when I was wanting to make some fun and useful handmade gifts. I ended up making baskets for an online friend, a baby shower gift, a Christmas present and one for my own bathroom.
I've been on a mission to use up my yarn stash and came to some chunky yarn...so my thoughts went back to the baskets.....so I'm making more and thought (and some of you asked) I would share the link with all of you! Also now I won't have to go hunting for it again...lol

Chunky Crocheted  Baskets
(I'm crocheting using 2 strands of chunky yarn and a 7mm hook, though the pattern calls for an 8mm)

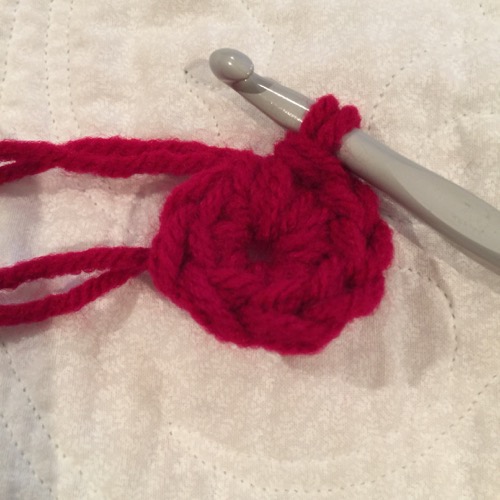
Make your normal loop and chain 2


This is maybe the trickiest...getting the 8 sc into the 2nd chain from the top or you first chain stitch.

 it's tight but doable.....

 I slip to join the round, then chain 2


  Then you follow the directions, but you can totally choose what size you want your basket to be, by adding rounds to the base before you start on the sides. Or do less rounds to make an even smaller basket. Also choose how tall you want, by adjusting how many rounds you do. That way you can have as many nesting baskets as you want.


 (hdc and then chain missing stitches and continuing to hdc on the other side produces a handle. If you adjust the pattern just remember to adjust the placement of your handles so they will line up with each other, on either side of the basket.)


 Next round you sc around the chain stitches to add cushion and thickness to the handle area


 I won some labels from All This Wood and am loving adding them to my handmade items!! Such a nice finish....


That's it, enjoy making some of your own....but don't be surprised if you thumb hurts a bit....lol.....its worth it though :)